LED blinker By Arduino UNO

Required Materials
1.BREAD BOARD
2.JUMPer WIRES(male to male)
3.UPLOADING CABLE
4.ARDUINO UNO
5.LEDS
Step 1:
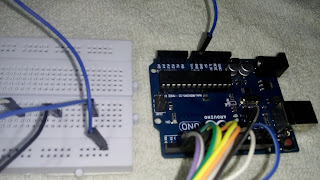
Connecting Jumper to the arduino uno digital pins from( 2 to 11),Which act as a positive pins.
 |
| 1.2 |
 |
| 1.3 |
Step 2:
Connecting another end of the male to male jumper wire to the bread board IN ORDER.
 |
| 1.4 |
 |
| 1.5 |
Connect GND(ground pin(-ve)) in arduino uno to the breadboard as shown in figure.Resistor(1k ohm) is depending upon leds which your are using.Resistor is connected to the GND jumper if required.See figure (1.8) I am showing to use resistor
1.6
Step 3:

Connecting LEDs in bread board Positive lead(longer) of the LED is connected to the jumper wire section in bread board.
Negative lead(shorter)of the LED is connected as shown in figure.
 |
| 1.7 |
 | ||
| 1.8 |
Finally construction of LED blinker using Arduino UNO is completed.
WARNING:LED are very sensitive to voltage so careful.
NOTE:Resistor are only used to reduces the current flowing through the voltage.

Program for this project:
void setup()
{
pinMode(2,OUTPUT);
pinMode(3,OUTPUT);
pinMode(4,OUTPUT);
pinMode(5,OUTPUT);
pinMode(6,OUTPUT);
pinMode(7,OUTPUT);
pinMode(8,OUTPUT);
pinMode(9,OUTPUT);
pinMode(10,OUTPUT);
pinMode(11,OUTPUT);
}
void loop() {
for(int i=2;i<12;i++)
{
digitalWrite(i,HIGH);
delay(100);
digitalWrite(i,LOW);
delay(100);
}
for(int i=11;i>1;i--)
{
digitalWrite(i,HIGH);
delay(100);
digitalWrite(i,LOW);
delay(100);
}
}
Comments
Post a Comment